Zid Docs
Apps
ThemesPayments
Apps
ThemesPayments
Help Center
Slack
  1. Apps
  • 🗂️ Overview
  • 🚀 Start Here
  • Create your First App
  • Responses
  • Rate Limiting
  • Authorization
  • Embedded Apps
  • StoreFront Events
  • Zid MUI
  • Zid SDKs
  • Our custom MCP server
  • Merchant APIs
    • Account
      • Me
        • Me
        • Profile
      • Store
        • Store
        • Branding
        • Localization
        • Social
        • Operations
        • Business
        • Upload Logo Image
        • Delete Logo Image
        • Upload Icon Image
        • Delete Icon Image
        • Upload Cover Image
        • Delete Cover Image
    • Orders
      • Validate Order Request
      • Create Order
      • Change Order Status
      • Add Order Comment
      • View Order
      • List Orders
      • List Custom Order Statuses
      • List Order Credit Notes
    • Reverse Orders
      • Create Reverse Orders
      • Create Reverse Orders Waybill
      • Add Reverse Order Reasons
      • List Reverse Reasons
      • Calculate Reverse Totals
      • Create refund for reverse order
      • Upload bank transfer receipt
      • Update return products
      • Order Details – View for Return
    • Abandoned Carts
      • List Carts
      • View Cart
    • Products
      • Managing Products
        • Create Product Types
        • Create Product
        • List Products
        • View Product
        • List Product Settings
        • Update Product
        • Bulk Update Products
        • Delete Product
      • Digital Vouchers
        • List Vouchers
        • Order Vouchers
        • Create Voucher
        • Import Vouchers
        • Export Vouchers
        • Update Voucher
        • Remove Voucher
      • Product Categories
        • List Categories
        • View Category
        • Create Category
        • Create Subcategory
        • Update Category
        • Assign Product to Category
        • Bulk Assign Products to Category
        • Publish Category
        • Detach Category from All Products
        • Remove Product from Category
      • Product Badge
        • List Badges
      • Product Attributes
        • List Attributes
        • View Attribute
        • Create Attribute
        • Update Attribute
        • Delete Attribute
      • Product Attribute Presets
        • List Presets
        • Create Preset
        • Update Preset
        • Delete Preset
      • Product Variants
        • Create Variants
        • Create Custom Option
        • Update Custom Option
        • Delete Custom Option Field
        • Create Custom Input Field
        • Update Custom Input Field
        • Delete Custom Input Field
      • Product Sorting
        • Set Manual Product Order
        • Reset Manual Product Order
      • Product Images
        • List Images
        • Upload Image
        • Update Image Order
        • Delete Image
      • Product Availability Notifications
        • Notification Stats
        • Noticiation Settings
        • List Notifications
        • Create Notification
        • Update Settings
        • Send Notification Email
        • Export Notifications
      • Product Export
        • Email All Products to Store Owner
        • Import Products via CSV or xlsx File
      • Product Stock
        • Retrieve Product Stock
        • List Product Stock Records
        • Create Product Stock
        • Update Product Stock
        • Bulk Update Product Stock Records
      • Product Questions & Answers
        • Retrieve Product Question
        • Retrieve Product Answer
        • List Product Questions
        • List Answers for Question
        • Create Product Question
        • Create Product Answer
        • Update Product Question
        • Update Product Answer
        • Delete Product Question
        • Delete Product Answer
      • Product Reviews
        • List Reviews
        • Count Reviews
      • Digital Products
        • Create Downloadable Product
        • Generate Upload URL
        • Upload File to S3
        • Create Product Downloadable
        • Get Product Downloadables
        • Delete Product Downloadable
        • List Store Downloadables
        • Create Store Downloadable
        • Delete Store Downloadable
    • Inventories
      • Create Location
      • Update Location
      • Update Product Stock for Location
      • List Locations
      • View Location
    • Shipping
      • List Store Shipping Methods
    • Marketing
      • Coupons
        • List Coupons
        • View Coupon
        • Create Coupon
        • Generate Bulk Coupons
        • Duplicate Coupon
        • Duplicate Bulk Coupons
        • Update Coupon Note
        • Update Coupon
        • Update Bulk Coupons
        • Update Coupon Status
        • Update Bulk Coupons Status
        • Delete Coupon
        • Delete Bulk Coupons
      • Bundle Offers
        • List Bundle Offers
        • View Bundle Offer
      • Loyalty Program
        • Loyalty Program Status
        • Loyalty Program Details
        • Loyalty Program Info
        • Customer Loyalty Summary
        • Customer Points History
        • Activate Loyalty Program
        • Set Points Expiration Rules
        • Update Cashback Rule
        • Create Points Redemption Method
        • Update Points Redemption Method
        • Delete Points Redemption Method
        • Adjust Customer Points
      • Discount Rules
        • List Discount Rules
        • View Discount Rule
        • Create Discount Rule
        • Update Discount Rule
    • Customers
      • Customer Tags
        • List Customer Tags
        • Add Customer Tag
        • Ů’Update Customer Tag
        • Delete Customer Tag
      • List Customers
      • View Customer
      • Primary Customer List
      • FInd Customer By Phone Number
      • Customer Profile
      • Add Customer
      • Update Customer
      • Delete Customer
      • Add Bulk Customers
      • Import Customers
    • Store Settings
      • đź“„ User Roles and Permissions
      • Retrieve Store Manager Profile
      • Retrieve VAT Settings
      • List Payment Methods
      • List Store Operating Countries
      • OneSignal Store Settings
      • Create or Update OneSignal Store Settings
    • Countries and Cities
      • List Countries
      • List Cities for Country
    • Blogs
      • Settings
        • Create
        • List
      • Categories
        • Create
        • List
        • Bulk Activate
        • Bulk Deactivate
        • Bulk Delete
        • Retrieve
        • Destroy
        • Partial Update
        • Bulk Add To Posts
        • Bulk Remove From Posts
      • Posts
        • Media
          • List
          • Create
          • Destroy
        • Create
        • List
        • Retrieve
        • Partial Update
        • Destroy
        • Archive
        • Publish
        • Bulk Archive
        • Bulk Publish
        • Bulk Delete
        • Export Posts
        • Import Template
        • Import Posts
      • Tags
        • Create
        • List
        • Retrieve
        • Partial Update
        • Destroy
        • Bulk Delete Tags
        • Bulk Add To Posts
        • Bulk Remove From Posts
      • Storefront
        • Posts
          • List
          • Retrieve
        • Categories
          • List
          • Retrieve
        • Tags
          • List
  • Webhooks
    • Overview
    • Webhook Health Tracking
    • Events
      • Order
      • Product
      • Abandoned Cart
      • Customer
      • Product Category
    • APIs
      • Health Summary
      • Broken Webhooks
      • Recover Broken Webhooks
      • List Webhooks
      • Create Webhook
      • Delete Webhook
      • Delete Webhook By subscriber
  • App Management
    • Events
    • APIs
      • Subscription Details
      • Update Usage-Based Charges
  1. Apps

Authorization

OAuth 2.0 is the industry-standard protocol for authorizing apps, allowing secure access to resources without exposing sensitive data like passwords. It differs from authentication, which verifies the identity of the user or app.

Understanding OAuth 2.0 at Zid#

At Zid, we use the authorization code grant type, which is ideal for confidential clients. This method involves redirecting the user to an authorization server, where they grant permissions to your app. Your server-side app must handle this process, as it requires securely managing the Client Secret.

Key Concepts in Zid’s OAuth 2.0 Flow#

Authorization Token: This token grants your app access to the Zid API.
X-MANAGER-TOKEN: This token allows access to a specific store on the Zid platform. It adds an extra layer of security, particularly when interacting with store-specific resources.
Access-Token: Used interchangeably with X-MANAGER-TOKEN in Product component API endpoints for technical reasons.

Important Requirements:#

đź’ˇYour app must run server-side because it needs to securely store the Client Secret during this process.
đź’ˇAll API requests into our system require the call to be authorized, usally by sending Authorization & X-Manager-Token headers

What's the difference between Authorization token and X-MANAGER-TOKEN?#

Authorization token permits you to access Zid API, while X-MANAGER-TOKEN permits you to access a particular store.

What's the difference between X-MANAGER-TOKEN and Access-Token?#

There is no difference between them, but we use Access-Token with Product component API endpoints for technical reasons.

Base URIs#

When developing apps on Zid, you’ll work with two main URIs:
1.
Base API URL: Use this to interact with various resources like orders, products, and coupons.
https://api.zid.sa/v1
2.
Base OAuth Server URL: This URL is for handling app authentication.
https://oauth.zid.sa
đź’ˇ Please note that the latest version of our API is v1. Older versions are deprecated and should not be used.

Benefits of Using OAuth 2.0 with Zid#

Secure Access: OAuth 2.0 ensures that your app accesses Zid resources securely without exposing sensitive information like passwords.
Scoped Permissions: Define specific access levels through scopes, allowing merchants to control what data your app can access.
Token-Based Authentication: Tokens are time-limited, reducing the risk of unauthorized access if a token is compromised. Merchants can revoke access at any time.

Implement OAuth 2.0 in your app#

1- Generate Client ID and Client Secret#

The first step is to retrieve an API id and API secret key, which you get when you create an app. These API credentials identify your app during the authorization process.
Log in to your Partner Dashboard.
Click Apps.
Choose the type of app that you want to create.
Click Create app.
Enter the app name, app URL, and allowed redirection URLs for your app.
Click Create App.
Scroll to API Keys to view your API key and API secret key.

2- Redirect (Ask for merchant permission)#

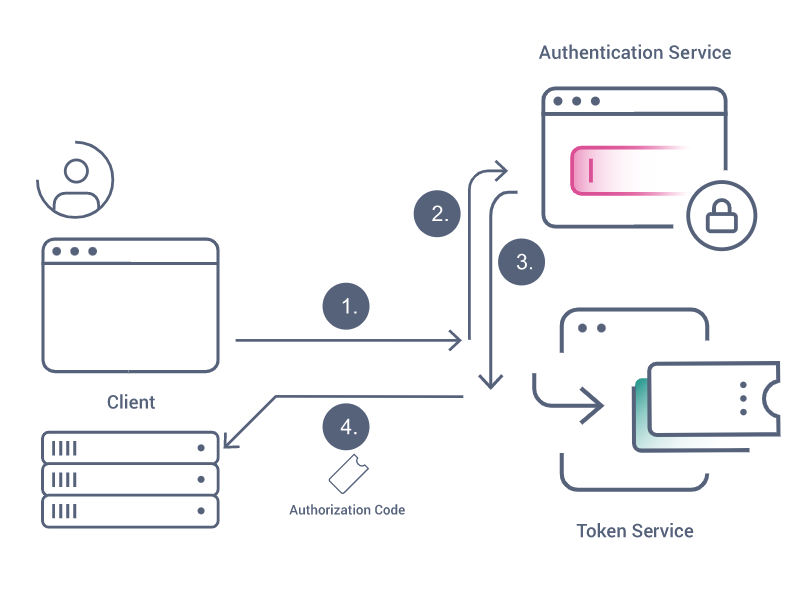
Screen Shot 2022-02-22 at 4.47.26 PM.png
The installation process starts with your application via the redirection url, followed by these scenarios:
Browser redirects to the Authorize endpoint of the OAuth Server (Zid AppMarket)
If the merchant isn’t authenticated, the OAuth Server redirects to the Login page
The merchant authenticates, and is redirected back to the OAuth Server
The merchant will see the scopes that your application is requesting and approve (or decline)
The OAuth Server issues a one time token called an Authorization Code which will be sent to your application in the next step
Here is a code example (PHP/Laravel) of this method:
you will construct an API call to our OAuth server along with some required parameters as follows:
client_id => your application clinet id from the partner dashboard
redirect_uri => an endpoint your application must implemnt (see step 2)
response_type => OAuth2 flow to be used
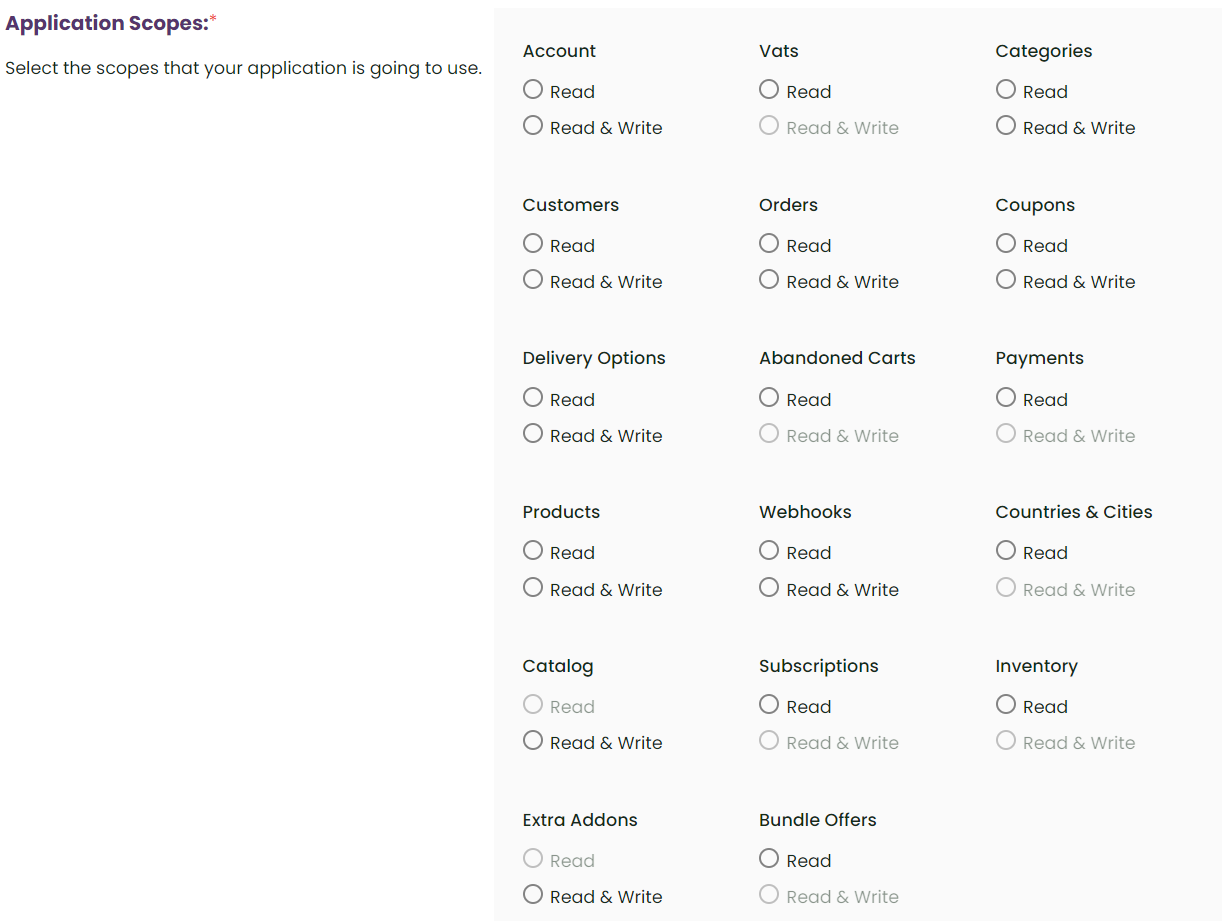
Zid AppMarket supports many scopes to be requested from the merchant; you can select the needed scopes for your application via your application page in the Partner Dashboard
App Scopes.png

3- Callback Method (Get the tokens)#

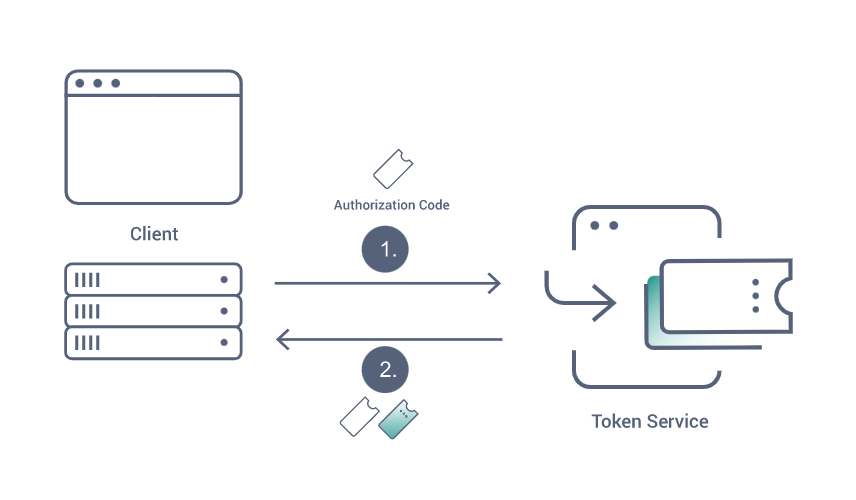
Screen Shot 2022-02-22 at 4.51.40 PM.png
Our OAuth server will send the code to your pre-defined method (the callback method)
Your app backend makes a POST request to the Token endpoint with the Authorization Code and Client Credentials
The OAuth Server validates the code and the credentials, and returns an access token and optionally a refresh token if configured on the client
Your App will save the returned token to be used in the future
Here are code examples of this method.
curl -X POST https://oauth.zid.sa/oauth/token \
     -d "grant_type=authorization_code" \
     -d "client_id=48" \
     -d "client_secret=LsswUNyWTjyKT9AsXnpsv3FnG4glSNZQ5SM3YRnD" \
     -d "redirect_uri=http://client.test/oauth/callback" \
     -d "code=your_authorization_code_here"
Note: In all examples, the payload is sent in the request body, not as query parameters.
the $response variable will hold all the needed data to be authenticated into that merchant store; the payload will be as follows:
access_token: to be sent with each request
Authorization: to be sent with each request
refresh_token: to refresh the token once it is expired
expires_in: the expiry date for this token (1 year)

Authorization token#

Authorization token can be generated directly through our OAuth 2.0 server (once a merchant install your application, you will get this token via the callback method). This token will be used in your outgoing request as the authorization header.
All API requests must be made over HTTPS. Calls made over plain HTTP will fail. API requests without authentication will also fail.

X-Manager-Token (access_token)#

This token represnt an extra layer of security, and it is required to send it with Authorization token, to illustrate how your api call should look like, take a look on this sample cURL:
You will need to pass the content of access_token under the name X-Manager-Token, and Authorization for every request.
Please consider that the manager token expires in 1 year.
The data returned in this endpoint must be kept in a secure storage, abusing token might block your app.

4- Refresh#

Sooner or later your tokens will expire; in order to refresh them, you build a small method to it as follows:
Please consider that Refresh Tokens will expire in 1 year so you have to run this function before the year runs out let’s say 10 months or so.

Handling Errors#

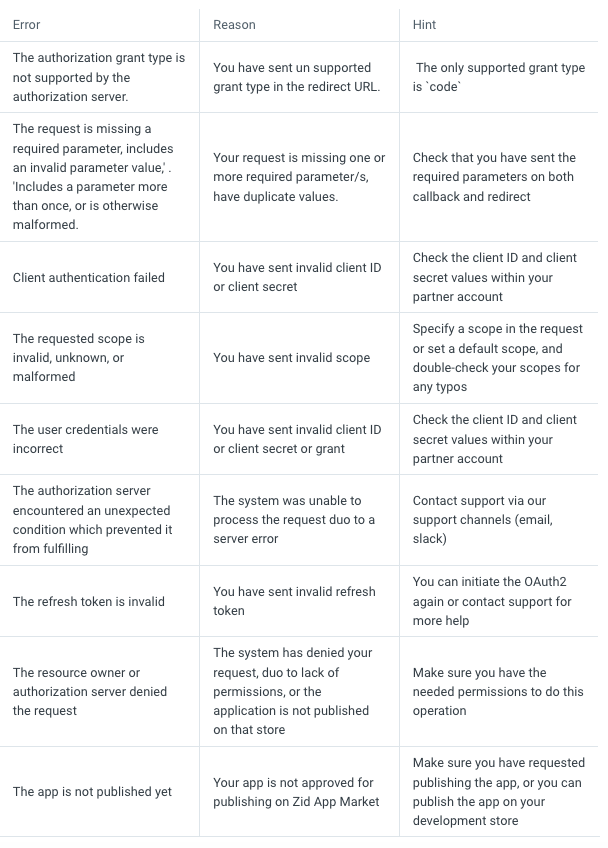
While you are testing and developing your application, you could face some issues in the integration or during the OAuth2.0 process. We have listed the most common errors and how to solve them.
Screen Shot 2022-02-22 at 4.56.20 PM.png
When the merchant uninstall your app, we will send you a webhook with this event and the tokens you have will be invalid.

Security and Best Practices#

X-MANAGER-TOKEN: Ensure this token is kept secure as it provides access to specific store resources.
Secure Storage: Store all tokens securely to prevent unauthorized access.
Token Expiry: Monitor token expiry dates and refresh them in a timely manner to maintain uninterrupted access.
Got it! Here's a refined, merged version that sticks strictly to the given information while maintaining clarity:

Sample Oauth Clients#

We have developed a sample starter app to help you kick-start your integration:
1.
Larvel App Sample Here.
2.
Node JS with Express App Sample Here
Modified at 2026-02-08 10:06:24
Previous
Rate Limiting
Next
Embedded Apps
Built with